Online shoppers are a group of consumers that never sleep. Online retail has grown from $2.382 billion in 2017 to $5.542 billion in 2022, and it's due to grow another 50% in the next four years — hitting $4.9 trillion by 2025.
Customers can be found at any time of the day, anywhere in the country, and anywhere on the globe, with the marketing ecosystem thriving more than ever.
The big question is: how can you tap into that blossoming resource and make the most out of one of the fastest-growing areas of trade in the world?
The good news is that it's now easier than ever to get started with a small business with your own hours and personality, and you can start it from the comfort of your living room.
In this article, we'll give you a step-by-step guide on getting started with your own shop on Facebook.
Let's dive in!
Facebook Shops is a newly introduced feature for retailers to display, post, and advertise their products on Facebook and Instagram to deliver an easy digital shopping experience for customers.
The feature aims to indulge the shopping experience so that any customer in any situation or circumstance has easy shopping accessibility (especially in unstable times due to the COVID-19 pandemic).
In Facebook Shops, a retailer can showcase their collections and products, as well as customize the layout and design of the shop.
Sellers get full management of the experience they display to their consumers and can let their creativity shine to get the most out of their business.

Facebook Shops is not to be confused with Facebook Marketplace, which features one-off sales listings of typically second-hand or used items. Facebook Marketplace isn't a retailer-to-consumer environment. Instead, sellers are regular consumers in an active and fast-paced community where everyone is buying and selling.
Retail in online spaces such as social media and digital communities has never been more active. Today, online selling allows one-stop shopping straight to a customer's door with a single click.
Small businesses have been born en masse; sellers have more tools than ever to get them established in online marketplaces, with expert help condensed into easy interfaces and programs to get the process started at the tap of a button.
It also opens up opportunities for a flexible work-life balance; you are your own boss. You don't have to work any set hours and completely control the entire process. You craft your shop's identity and flavor from the ground up and put that little bit of yourself out there to share with the world while also earning money from it.
And, of course, you operate from wherever, whenever! Be it from bed in comfy pajamas to the living room with some Netflix in the background — how you operate is completely in your control.
Starting a shop is accessible to anyone, and yes, that includes you!
So. Now you know what a Facebook shop is. But how do you start one? Follow these steps:
In case you don't already have a Facebook account, signing up is easy and only takes a couple of minutes.
You will need a Facebook business page to run a Facebook shop. To set up a business page, navigate to the "Pages" tab on the left of your home screen, and then click "Create New Page," filling in the details before clicking "Create."
Two other things you'll need to ensure are that:
To get started, you'll need to navigate to the "Shop" tab on the left-hand side of your business page. If you can't see this tab, you may need to adjust your template in settings by going to "Settings," then "Templates and Tabs," and editing the current template.
After a pop-up appears that gives a quick overview of the set-up process, you'll be able to dive right in by clicking the "Get Started" button.
First, follow the prompts to enter in details such as your shop address and type of business.
After you fill that out and click "Next," you will be asked to give your tax information. While you can do this later, you must give this information at some point to properly conduct business and receive payments. Following that, Facebook will ask what kind of products you intend to sell.
Next up is information about your type of business and your business representative. A business representative is someone who acts as a bridge between a company and clients. In this case, this person will likely be you.
Following this is shipping options, return policies, and customer service contacts. This is easy enough, as it just requires you to pick from a list of available options.
It is worthwhile to note that per Facebook's merchant terms:
Keeping all this in mind, finish up by agreeing to the merchant terms (if you haven't already), and you'll be taken to your new shop page.
Your country of operation will determine your payment options. Some countries allow services like Paypal; others operate by linking a bank account, so payments are immediately deposited there.
Regardless, Facebook will show this process to you step-by-step with plenty of instructions suitable to your country and payment options. All you need to do is click the "Set Up Payments" button to open a pop-up that will begin the process, starting with your tax details.
You cannot skip this section, and it cannot be changed later, so take that little extra time to make sure all your information is correct.
The next and final step is setting up a bank account or linking a Paypal account. Again, ensure that the details are correct to save time and possible heartache later on. Once it's all in, click "Save" to finish the process.
This is where the fun part starts!
Now that all the administrative info is done, you can start adding your products to your page with a few easy steps.
Your page will encourage you to add your first product, which you can do by clicking the "Add Product" button.
From there, a pop-up opens with all the necessary details to showcase and manage your products; product name, price, description, photos and videos, inventory, shipping options, and more.
Feel free to get creative and passionate; add a detailed description, upload gorgeous photos that show the item's unique flair, and share the product on your page the moment it's created to get some buzz going.
Once you're happy, click "Save," and there you go — your new product is visible in your shop!
You can repeat the process any time with any item by clicking the white box labeled "Add Product."
We're sure you're full of ideas and inspiration, so here are a few tips to help you channel that passion and get the most from your shop.
Customers will get a full taste of the range of your products if you create collections for them to browse.
Collections create an ordered and sophisticated browsing experience that gives your consumers more range to browse and choose from — boosting sales and fostering an enjoyable and memorable buyer’s journey.
Here's what a collection looks like for buyers:

Now, the fun part: color schemes, layouts, button sizes, and even text can all be changed to reflect your business, with a huge emphasis on the "your."
Take your time with this, as you want to create a positive impression of your shop’s personality, goals, and purpose in the world of online retail.
Tagging your products in posts will ensure your audience is always aware of the range of items your shop provides.
When you make a post, you can easily tag products — accompanied by a thumbnail showing price and product description — to make sharing your range of services streamlined and professional.

Often, this is how a lot of consumers will first discover you, so keep the posts professional, clean, and really invest in seeing what showcases your products and your shop’s personality most.
This is the step you’ll want to take the most care in. Window shopping still applies to online spaces, and customers will easily skip a post or product listing if the photos aren’t adequate.
Photos are the grabbing point for your customer’s interactions. Take the time to invest in adequate lighting, clean set pieces, and proper photography. Dedicate yourself to playing around and discovering what works for you; not every shop will use the same atmosphere in their product listings, so experiment and see what connects with your consumers and your store the most.
Your Facebook shop can be set up and active in just a few small steps, with your products joining the thriving online retail ecosystem. In less than a few hours, you can manage, create, and start earning from your small business, and it’s all from the comfort of your own home.
But what about analytics and consumer metrics? That’s a whole other beast your small business will have to keep track of.
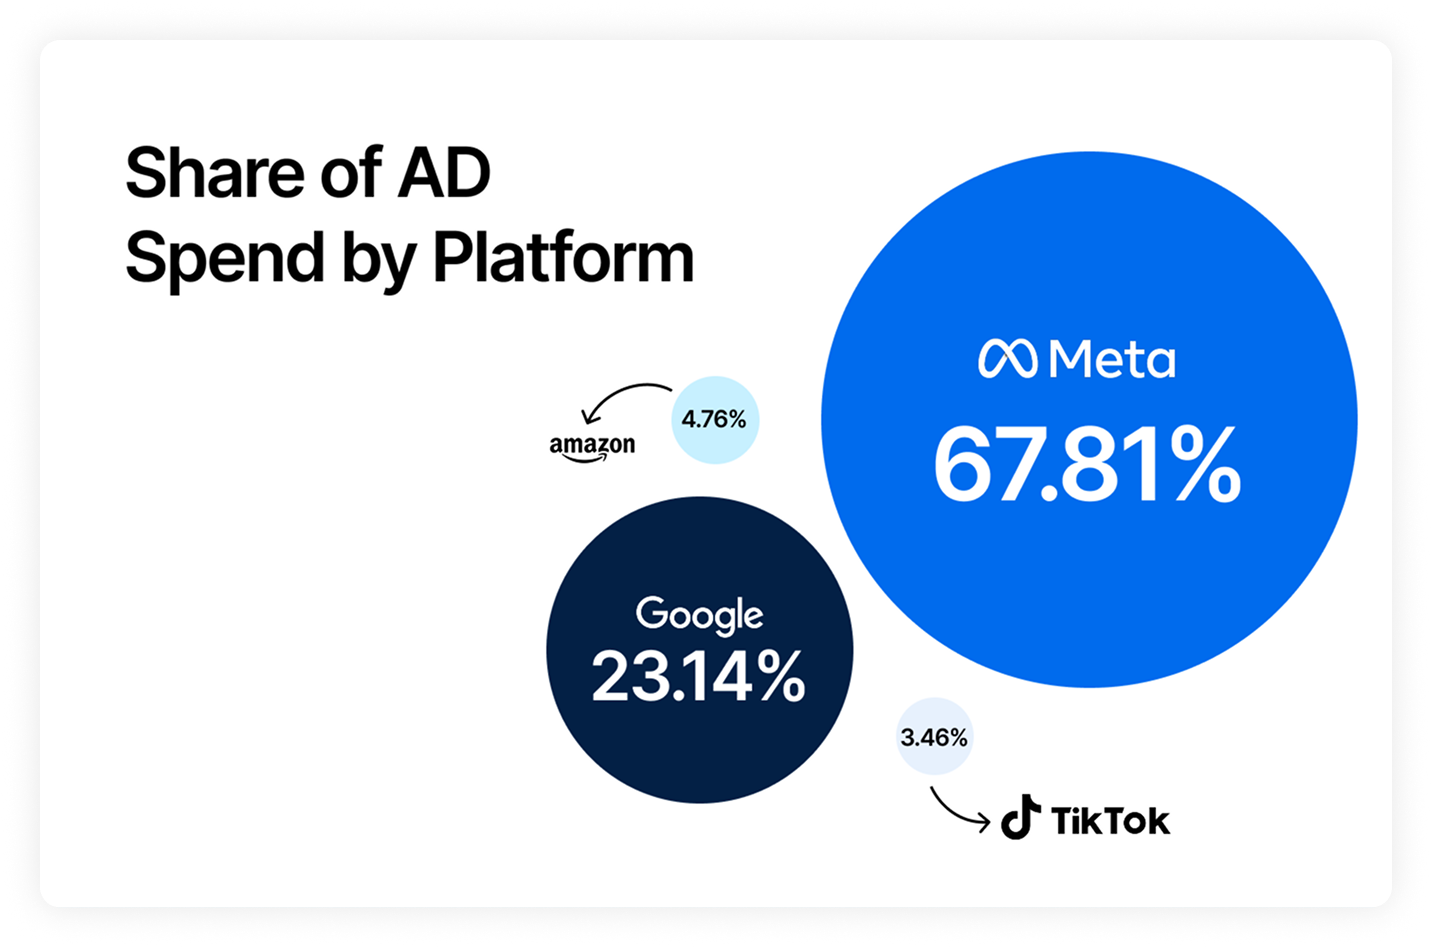
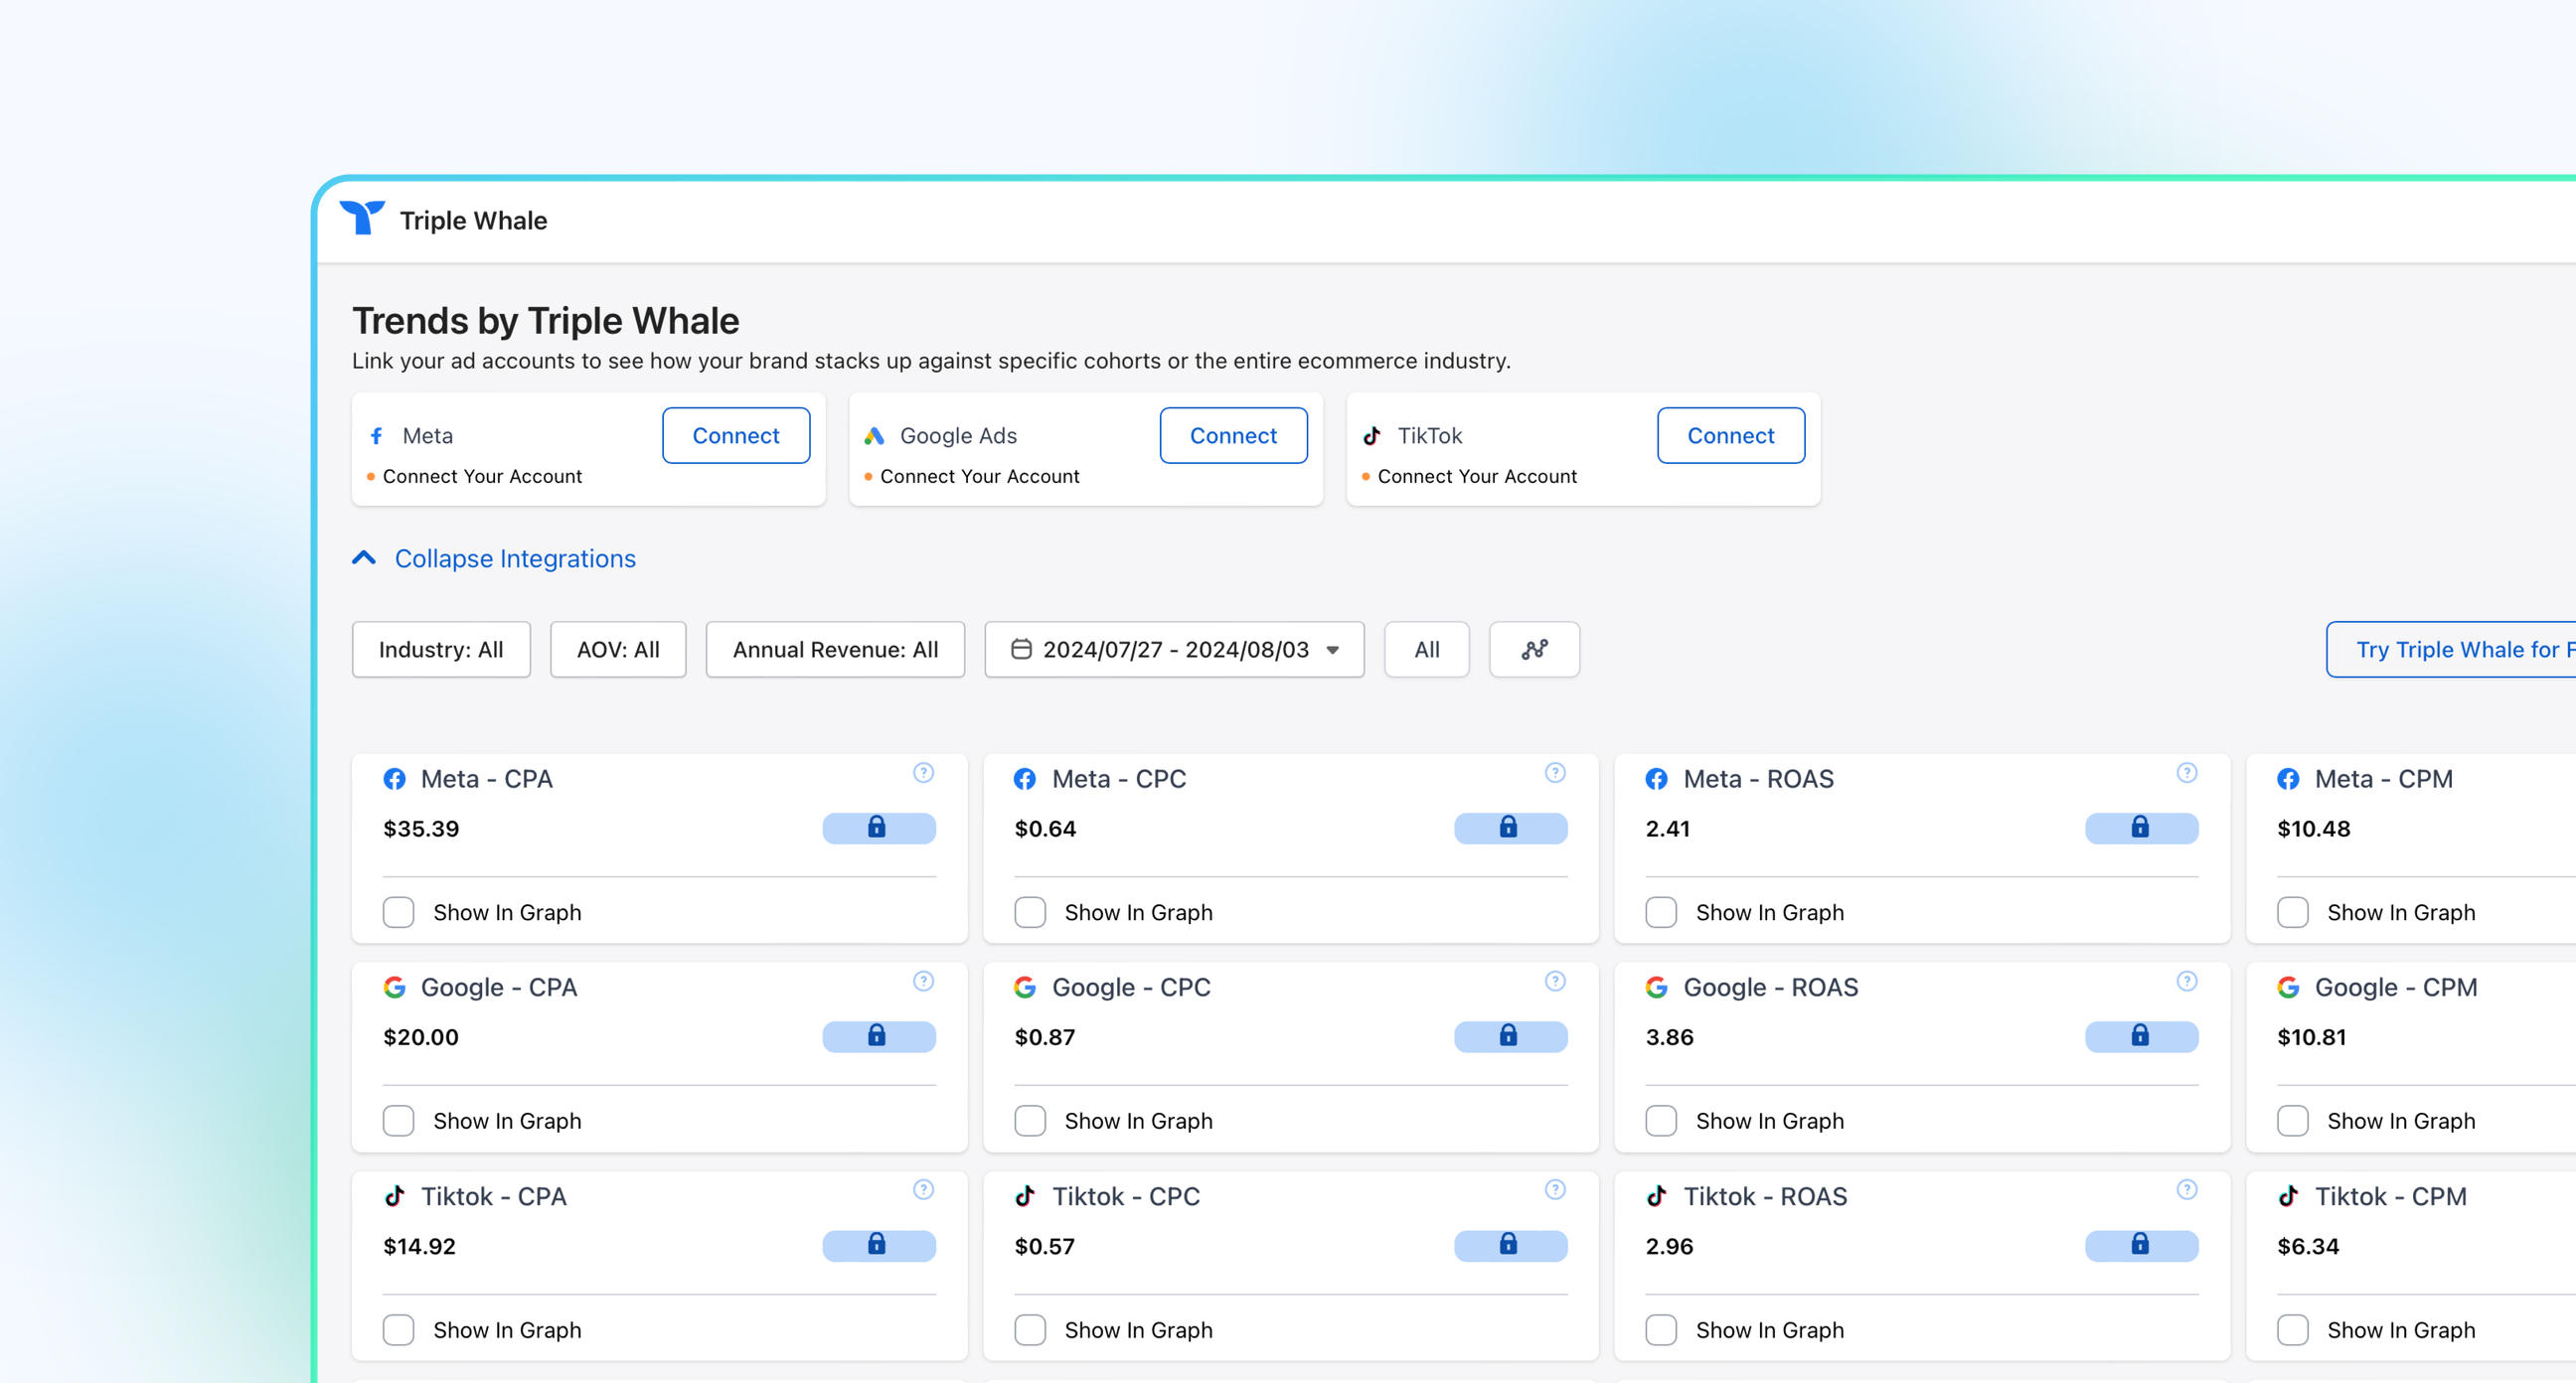
Why not try Triple Whale, the easiest way to manage and delegate your eCommerce metrics? With Triple Whale, all the hard work is done for you; no more hours spent analyzing consumer data and profits. Simply log in, and check your profits, consumer metrics, advertisements, and more.

Online shoppers are a group of consumers that never sleep. Online retail has grown from $2.382 billion in 2017 to $5.542 billion in 2022, and it's due to grow another 50% in the next four years — hitting $4.9 trillion by 2025.
Customers can be found at any time of the day, anywhere in the country, and anywhere on the globe, with the marketing ecosystem thriving more than ever.
The big question is: how can you tap into that blossoming resource and make the most out of one of the fastest-growing areas of trade in the world?
The good news is that it's now easier than ever to get started with a small business with your own hours and personality, and you can start it from the comfort of your living room.
In this article, we'll give you a step-by-step guide on getting started with your own shop on Facebook.
Let's dive in!
Facebook Shops is a newly introduced feature for retailers to display, post, and advertise their products on Facebook and Instagram to deliver an easy digital shopping experience for customers.
The feature aims to indulge the shopping experience so that any customer in any situation or circumstance has easy shopping accessibility (especially in unstable times due to the COVID-19 pandemic).
In Facebook Shops, a retailer can showcase their collections and products, as well as customize the layout and design of the shop.
Sellers get full management of the experience they display to their consumers and can let their creativity shine to get the most out of their business.
Facebook Shops is not to be confused with Facebook Marketplace, which features one-off sales listings of typically second-hand or used items. Facebook Marketplace isn't a retailer-to-consumer environment. Instead, sellers are regular consumers in an active and fast-paced community where everyone is buying and selling.
Retail in online spaces such as social media and digital communities has never been more active. Today, online selling allows one-stop shopping straight to a customer's door with a single click.
Small businesses have been born en masse; sellers have more tools than ever to get them established in online marketplaces, with expert help condensed into easy interfaces and programs to get the process started at the tap of a button.
It also opens up opportunities for a flexible work-life balance; you are your own boss. You don't have to work any set hours and completely control the entire process. You craft your shop's identity and flavor from the ground up and put that little bit of yourself out there to share with the world while also earning money from it.
And, of course, you operate from wherever, whenever! Be it from bed in comfy pajamas to the living room with some Netflix in the background — how you operate is completely in your control.
Starting a shop is accessible to anyone, and yes, that includes you!
So. Now you know what a Facebook shop is. But how do you start one? Follow these steps:
In case you don't already have a Facebook account, signing up is easy and only takes a couple of minutes.
You will need a Facebook business page to run a Facebook shop. To set up a business page, navigate to the "Pages" tab on the left of your home screen, and then click "Create New Page," filling in the details before clicking "Create."
Two other things you'll need to ensure are that:
To get started, you'll need to navigate to the "Shop" tab on the left-hand side of your business page. If you can't see this tab, you may need to adjust your template in settings by going to "Settings," then "Templates and Tabs," and editing the current template.
After a pop-up appears that gives a quick overview of the set-up process, you'll be able to dive right in by clicking the "Get Started" button.
First, follow the prompts to enter in details such as your shop address and type of business.
After you fill that out and click "Next," you will be asked to give your tax information. While you can do this later, you must give this information at some point to properly conduct business and receive payments. Following that, Facebook will ask what kind of products you intend to sell.
Next up is information about your type of business and your business representative. A business representative is someone who acts as a bridge between a company and clients. In this case, this person will likely be you.
Following this is shipping options, return policies, and customer service contacts. This is easy enough, as it just requires you to pick from a list of available options.
It is worthwhile to note that per Facebook's merchant terms:
Keeping all this in mind, finish up by agreeing to the merchant terms (if you haven't already), and you'll be taken to your new shop page.
Your country of operation will determine your payment options. Some countries allow services like Paypal; others operate by linking a bank account, so payments are immediately deposited there.
Regardless, Facebook will show this process to you step-by-step with plenty of instructions suitable to your country and payment options. All you need to do is click the "Set Up Payments" button to open a pop-up that will begin the process, starting with your tax details.
You cannot skip this section, and it cannot be changed later, so take that little extra time to make sure all your information is correct.
The next and final step is setting up a bank account or linking a Paypal account. Again, ensure that the details are correct to save time and possible heartache later on. Once it's all in, click "Save" to finish the process.
This is where the fun part starts!
Now that all the administrative info is done, you can start adding your products to your page with a few easy steps.
Your page will encourage you to add your first product, which you can do by clicking the "Add Product" button.
From there, a pop-up opens with all the necessary details to showcase and manage your products; product name, price, description, photos and videos, inventory, shipping options, and more.
Feel free to get creative and passionate; add a detailed description, upload gorgeous photos that show the item's unique flair, and share the product on your page the moment it's created to get some buzz going.
Once you're happy, click "Save," and there you go — your new product is visible in your shop!
You can repeat the process any time with any item by clicking the white box labeled "Add Product."
We're sure you're full of ideas and inspiration, so here are a few tips to help you channel that passion and get the most from your shop.
Customers will get a full taste of the range of your products if you create collections for them to browse.
Collections create an ordered and sophisticated browsing experience that gives your consumers more range to browse and choose from — boosting sales and fostering an enjoyable and memorable buyer’s journey.
Here's what a collection looks like for buyers:
Now, the fun part: color schemes, layouts, button sizes, and even text can all be changed to reflect your business, with a huge emphasis on the "your."
Take your time with this, as you want to create a positive impression of your shop’s personality, goals, and purpose in the world of online retail.
Tagging your products in posts will ensure your audience is always aware of the range of items your shop provides.
When you make a post, you can easily tag products — accompanied by a thumbnail showing price and product description — to make sharing your range of services streamlined and professional.
Often, this is how a lot of consumers will first discover you, so keep the posts professional, clean, and really invest in seeing what showcases your products and your shop’s personality most.
This is the step you’ll want to take the most care in. Window shopping still applies to online spaces, and customers will easily skip a post or product listing if the photos aren’t adequate.
Photos are the grabbing point for your customer’s interactions. Take the time to invest in adequate lighting, clean set pieces, and proper photography. Dedicate yourself to playing around and discovering what works for you; not every shop will use the same atmosphere in their product listings, so experiment and see what connects with your consumers and your store the most.
Your Facebook shop can be set up and active in just a few small steps, with your products joining the thriving online retail ecosystem. In less than a few hours, you can manage, create, and start earning from your small business, and it’s all from the comfort of your own home.
But what about analytics and consumer metrics? That’s a whole other beast your small business will have to keep track of.
Why not try Triple Whale, the easiest way to manage and delegate your eCommerce metrics? With Triple Whale, all the hard work is done for you; no more hours spent analyzing consumer data and profits. Simply log in, and check your profits, consumer metrics, advertisements, and more.

Body Copy: The following benchmarks compare advertising metrics from April 1-17 to the previous period. Considering President Trump first unveiled his tariffs on April 2, the timing corresponds with potential changes in advertising behavior among ecommerce brands (though it isn’t necessarily correlated).


.webp)

.webp)

.png)


.png)